


Reprinted from March 2016 USDF Connection
Your horse’s correct body alignment is key to dressage success. A USDF certification examiner shows you how.
By Gerhard Politz
In dressage, straightness has a sophisticated meaning. According to the USDF pyramid of training, a horse is said to be straight when the footfalls of the forehand and the hindquarters are appropriately aligned on straight and curved lines and when his longitudinal axis is in line with the straight or curved track on which he is ridden.
It is an accepted fact that horses’ bodies are crooked. Th is is a natural phenomenon—sometimes called handedness—that also occurs in humans and dogs. Science has yet to prove the reasons for equine crookedness. Several decades ago, it was believed that the position of the foal in the mare’s uterus had something to do with it. Other theories mention the dominant eye, or discomfort in the hind gut (acidosis). More recently, crookedness is thought to originate in the horse’s central nervous system.
Whatever the cause, it is important that dressage riders and trainers are able to identify and address a horse’s crookedness. We want the horse to become as athletic, supple, and strong as possible so that he can perform to the best of his ability. We also want him to stay sound for many years. Balance is one of the keys in achieving these goals. Regrettably, it happens all too often that a horse lacking straightness and proper balance, but ridden by a strong and overpowering rider, can perform certain tasks. This is not only unethical but also to the detriment of the horse’s soundness and longevity.
The Crooked Horse

USDF Illustration
A horse that is crooked cannot be balanced. He is stiff on one side and hollow (crooked) on the other (see illustration). Crookedness originates from asymmetrical locomotion of the hindquarters and manifests itself in a diagonal aspect. For example, when a horse is hollow (crooked) on his right side, his quarters will travel to the right of his shoulders. His right hind foot will step to the right of the imprint of his right fore. He is stronger on the left rein and leans on his left shoulder while avoiding contact on the right rein. The muscles on his hollow right side are shorter and inelastic, thereby preventing him from stretching into the right rein in the same way as he does on his stiffer and stronger left side.
To make the horse more symmetrical, the rider has to encourage him to stretch the tight musculature on his hollow right side so that he accepts the connection into the right rein. When this is successful, the stiffness and stronger contact on the left rein will be alleviated and the horse will become straight. Of course, the exact opposite holds true for the horse that is crooked on his left side.
A crooked rider is a major contributing factor to a horse’s crookedness. The more balanced, symmetrical, and supple you are and able to apply your aids independently and with synchronicity, the more you will be able to positively influence your horse. As the old saying goes: A horse can only go as well as he is ridden!
Identifying Crookedness
Crookedness can be a puzzling phenomenon. A skilled rider may sometimes be able to straighten a horse and it will remain straight its whole life, but most horses need to be straightened in every training session.
If straightening has been neglected during a horse’s training, he will display some or all of the following shortcomings. The examples I’m about to give are for a horse that is hollow (crooked) to the right.
The crooked horse shows discrepancies in his way of going from side to side. On the right rein he will easily bend his neck, but he will try “falling out” through his left shoulder while tracking sideways to some degree with his right hind leg. In severe cases, he may bend his neck but refuse to turn right. He will turn left with adequate use of the left rein, but he will resist bending his neck and body. He will try falling out with his right hind.
When leg-yielding off the rider’s right leg, it is harder for the hollow-right horse to cross with his right hind. He wants to bend his neck too much to the right and to bulge (fall out) through his left shoulder. You will have difficulty keeping him straight. However, when leg-yielding off your left leg, he will cross with his left hind more willingly, possibly even giving you too much angle. You will be able to keep him straighter with your left rein, but you may not have enough contact on your right rein.
Similarly, in shoulder-in right, he will also want to bend his neck too much and bulge through his left shoulder. It may be difficult to maintain a sufficient and consistent angle. In travers (haunches-in) right, he will easily bring his haunches off the track, and bulge his left shoulder as well. When half-passing to the right, the haunches will tend to lead. You may also have some difficulty keeping his shoulders on the designated line of travel.
When tracking left with the same horse in shoulder-in, you should have no problem maintaining the desired angle, but he will lack flexion and bend. In haunches-in, you will experience his reluctance to bend and to cross with his right hind. It will be difficult to maintain a consistent angle. The half-pass left will also show a lack of bend, and the haunches will tend to lag because he wants to avoid crossing with his right hind. The problems in half-passes may become more obvious in the trot and canter zigzags, and especially in the canter with the added difficulty of flying changes.
A hollow-right horse will want to make turns on the haunches and walk and canter pirouettes to the right larger than to the left. Because of his tendency to fall through his left shoulder, it will be harder to bring the shoulders around the haunches. He tries to avoid taking weight on his right hind by stepping sideways rather than underneath his body. In the left canter pirouette, you may experience some “crow hopping” as he tries to avoid loading his right hind.
In piaffe and passage, such a horse will show a tendency to use his hind legs irregularly, unevenly, or both. In some cases, the irregularity may even transfer to the diagonal front leg.
Crookedness Test

Romulus’s poll right, center (no flexion), and left
Photo by Martin Kuhn
To help you identify crookedness on a trained horse, try this simple exercise: At a halt, hold both reins with light tension, making sure that your horse is on the bit with his neck absolutely straight. Use your wrist to flex his poll to the right while maintaining an elastic contact on your left rein. Your horse’s crest should flop over in the direction of the flexion. When you feel him chewing on the bit, release enough so that he can straighten his neck. Repeat the exercise to the left. Alternate sides a few times. You will notice that flexing and flopping of the crest happens more easily in one direction. That is the hollow side. The other is the stiff side. This test is accurate with very few exceptions.
Schooling for Straightness
Lateral movements are an excellent means of addressing crookedness. Continuing with our example of the horse that’s hollow to the right, you’ll want to use shoulder-in right, haunches-in left, and renvers. (This does not mean you can neglect schooling lateral movements in other directions. You must gymnasticize the horse on both sides equally.)
When schooling shoulder-in right, align your horse’s shoulders with his haunches. It is helpful to increase the angle a bit while focusing on diagonal aids. To encourage him to stretch the inelastic muscles on his right side, drive him with determination to the right rein. Maintain an elastic contact, and be careful not to pull back. It is important that the horse stretches to the hand. Prevent him from falling out through his left shoulder, if necessary, with a neck-reining aid. Your left leg must create forward energy and “guard” his left hind leg.
In shoulder-in left, keep the conventional three-track angle. Use your inside leg at the girth to push the horse’s rib cage to the right in order to stretch the muscles on his right side. Your right leg behind the girth prevents the right hind from falling out. Place your inside hand close to the neck and hold it a little higher than your outside hand. Although you are asking for flexion, frequently yield the inside rein to encourage your horse to take contact on the outside rein.
When schooling haunches-in left, apply a firm outside leg behind the girth so that your horse crosses well with his right hind. Your inside leg at the girth maintains the impulsion and controls the angle. Be sure to create four tracks. Ask for flexion with your inside rein, but yield frequently so that he can stretch to the receiving outside rein.
As your horse’s right hind becomes stronger and he stretches his right side into the right rein—in other words, as straightness improves—the aids for lateral movements can be given in more of a textbook fashion.
When your horse can adequately perform haunches-in left, you can combine shoulder-in right with renvers. For example: As you approach B in shoulder-in right, allow your horse to come slightly off the rail and then change his bend as if you were going to ride haunches-in left. You are now in renvers, because haunches-in and renvers are essentially the same movement.
We tend to ride lateral movements along straight lines. However, the collecting effect is intensified when schooling them on circles. For example, on a hollow-right horse, ride shoulder-in on a 20-meter circle right. At X, make a volte left and then ride haunches-in on a 20-meter circle left. Or start in haunches-in on a 20-meter circle left; then change the rein at X out of the circle into renvers. Many more combinations are possible, and all will enhance collection and prepare your horse for more advanced work.
Encourage Straightness Right from the Start

The elements of the pyramid of training (see illustration ) are interdependent. Although straightness is listed as the fifth “level,” it is wise to address it early in the training of the young horse. The longer you delay, the more asymmetrically the muscles develop; consequently, any corrections will be more time-consuming. If you start the young horse with foresight, a lot of the problems associated with crookedness may perhaps be avoided.
When starting a green horse on the lunge and later under saddle, bear in mind that the essence of straightening entails getting him to stretch evenly into both reins. That is why you should never clip the lunge line to the bit rings; use a lungeing cavesson with the line on the center ring instead. The weight of the lunge line causes it to pull on the bit ring. As the horse moves, and especially if he becomes playful, the lunge line pulls harder on his mouth. In response, he backs off the pressure on his hollow side while clenching his jaw and grabbing the bit on his stiffer, stronger side. And right away you have created a lifelong problem, because this will become a habit under saddle, as well.

Photo by Martin Kuhn
In the beginning, do not clip the side reins to the bit rings, either. Instead, attach them to the rings on the side of the lungeing cavesson (see photo at right). They must be long enough so that your horse can bring his nose in front of the vertical when he stretches into the contact. Encouraging the horse to go forward with energy in trot and canter is vital to induce stretching. When this is confirmed—be patient, it may take some time—you can attach the side reins to the bit, making sure they are of equal length and still long enough that the horse can carry his nose in front of the vertical. Never use side reins to force a young horse into a “frame.”
If you observe these principles and hone your lungeing skills overall (refer to the USDF Lungeing Manual), you are taking the initial steps toward straightening your horse. He has learned to seek his horizontal balance while using his hind legs energetically and stretching forward to the bit.

DEHNUNGSHALTUNG: German term indicating the horse’s willingness to adopt a forward/downward outline. Julie demonstrates Dehnungshaltung in working trot. 
DEHNUNGSHALTUNG: German term indicating the horse’s willingness to adopt a forward/downward outline. Jordan Meadows rides her horse, Baylyn, in Dehnungshaltung in a stretching circle.
Photos by Anita Nardine
Under saddle, riding forward at a lively pace with light and even contact into both reins is a must. Your horse has to learn to work in Dehnungshaltung, a German concept meaning that he is willing to adopt a forward/downward outline. Do not allow him to lean on the bit, however. He must find balance within himself instead of using the reins as a “fifth leg.”
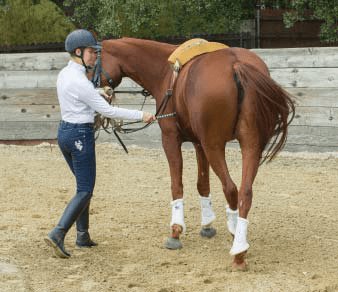
Photo by Anita Nardine
The next step is to allow the horse to actually take the contact, at which point your hands receive the energy from his hind legs. When this happens, he will come onto the bit naturally, and we can school him in Dehnungshaltung and then gradually modify his tempo. I cannot stress enough the importance of confirming the young horse in Dehnungshaltung. It is the best method of producing relaxation and suppleness in the horse’s musculature. Use it every day in your warm-up and as a reprise after schooling movements.
Introducing Leg-Yield
At some point during early training, it is helpful to teach your horse to cross over with his hind legs. Initially, teach him from the ground using a whip (see photo above). Touch him with the whip on the hind leg, finding the spot where he responds readily. When this works well on both sides, ask him to move away from pressure of the whip’s handle in the same place as your leg. He is now ready to learn the turn on the forehand and to leg-yield under saddle.
To straighten your horse under saddle, he must accept and move away from the sideways pushing leg. Later, we can use lateral movements such as shoulder-in, haunches-in, and renvers not only to polish straightness, but also with the goal of achieving collection.

Photo by Martin Kuhn
Always school leg-yield in walk before attempting it in trot. To begin with, it is neither necessary nor advisable that the young horse leg-yields in trot at the same angle as in walk. Make it easier for him by allowing him to slow down a little bit, but do not condone actual laziness or stalling out into walk. Much later, when he is sufficiently strong, you can increase the angle—never more than 45 degrees— and encourage him to cross with longer, sweeping steps.
In our continuing example of the hollow-right horse, push his right hind leg forward and a little to the left with a leg-yielding aid, while at the same time “guarding” with your outside leg to keep him straight. Prevent him from bulging through his left shoulder by moving your left fist close to his withers, almost thinking of a tiny bit of counterflexion. The aids are similar to those for shoulderfore—but we are not asking for bend, which comes much later. Do not hold on tight with your left hand; doing so would encourage the horse to lock even more onto the left rein, which he’d like to do anyway. Round your left wrist until he gives; then immediately lighten the contact. Repeat this in a steady rhythm—not in a nagging way, but just so that he feels contact but cannot grab the bit.
On the right rein, try to maintain an even and elastic connection in the leg-yield without pulling back so you encourage your horse to stretch toward the right rein (see photo above right).
Tracking left on the hollow-right horse, be mindful of the aids for haunches-in, but do not ask for bend at this stage. Push his right hind a little to the left while also driving forward to the right rein, where you must receive the energy with a steady and passively elastic contact. Your forward driving left leg keeps him straight. Because he favors a stronger contact on the left rein, frequently take and release the left rein. Try obtaining flexion at the poll with a wrist action while holding your left hand a bit higher than your right.
As the young horse gradually understands and accepts these rudimentary straightening aids, you can improve his vertical balance further by schooling leg-yield in trot. Helpful patterns are: from the center line back to the rail, from the corner to the quarter line or center line, or the more difficult counter-change of hand. Practice all of these patterns in both directions, bearing in mind symmetry, straightness, shoulder control, and crossing of the legs.
Circling a hollow-right horse to the right, apply the diagonal aids described above. Leg-yield with your inside leg so that his right hind steps exactly toward his right fore. With your outside leg at the girth, drive him toward the left rein. Do not apply your outside leg behind the girth because that will bring his haunches to the right—exactly what we don’t want to do! Avoid the temptation of using the right rein to bend the horse; strive for a passively elastic contact instead. You may have to carry your right hand a little to the side, like an opening rein, to guide your horse on the circle line. Prevent him from falling through his left shoulder by counterflexing him as needed. Do not allow him to lock on the left rein; take and give the rein with your left wrist until you feel that he wants to take a contact on the passively held right rein.
When circling to the left, the hollow-right horse wants to lean on his inside shoulder. He will spiral into the circle if you try to bend him. To prevent this, carry your left hand a bit higher. Flex your left wrist and then yield the rein frequently, like Überstreichen, to encourage him to seek more contact on the outside (right) rein. Your inside left leg at the girth must push him out onto the circle line. Your outside leg behind the girth prevents the right hind from falling out and also creates energy toward the right rein. When your horse stretches into the right rein, ease your hand forward to help create left bend.
During the early stages, do not be too concerned with bend. Be patient, and allow enough time for the horse to respond to correct straightening aids. When he has learned to take an even connection into both reins, bending becomes much easier. When he bends correctly on 20-meter circles in both directions with appropriate connection, you should begin schooling him in all recognized school figures requiring bending lines.
Some talented young horses may reach this stage relatively early, but I cannot stress enough that it is important to take your time consolidating all the techniques and methods I’ve described. Think in terms of a year and a half to two years. The more the horse is solidly confirmed in the basics and has acquired a correctly straightened way of going, the easier will be all subsequent schooling.
Lateral Work and Beginning Collection
When you have successfully navigated your young horse through the stages of horizontal and vertical balance, you can introduce him to lateral work and the beginnings of collection.

Photo by Anita Nardine
Make it easy for him. The bend required on a 15-meter circle is the same as in shoulder-fore. So start on a 15-meter circle and then take the bend down the rail to develop shoulder-fore and “baby” haunches-in. During this work, verify that your horse stays well connected on the outside rein and does not attempt to push through his outside shoulder. You should be able to practice Überstreichen with your inside rein without losing bend. These are indicators that he is correctly aligned, and you can straighten him as needed. As he becomes stronger and you feel the “baby” lateral movements are confirmed, begin developing shoulder-in and haunches-in from a 10-meter volte.
Training seldom follows a linear progression. There will inevitably be problems along the way. Do not make the mistake of grinding away at the problem itself. Return to the basics! When the basics are reestablished, the problem will often disappear, too.
Gerhard Politz is a British Horse Society instructor who also obtained his Master Trainer/Instructor license in his native Germany before immigrating to the US in 1987. Since that time he has been based at Flintridge Riding Club, near Pasadena, CA. He has trained and taught numerous horses and students to awards at the FEI levels, and he is an examiner in the USDF Instructor Trainer Program.


